Once again, Happy Earth Day!
This week I made about 40 cove and bead strips for the rails of the surfboard that I am doing. I also uploaded my first video. Hey it's like a one year anniversary present for Wood Water Crafts!
Cove and Bead means that one side going down the length of the strip is concave and the other side convex. This allows the strips to be laid on top of one another (with glue in between) and form around a sharp curve like on the rail of a surfboard.
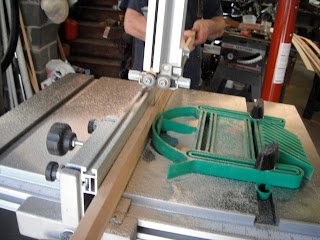
In the next post, you will see the lumber that I got downtown for free last weekend. Some of which I was able to make into cove and bead strips for the surfboard. Shown below is one of 6 or 7 planks of pine that had no knots in it. It was completely clear with a nice straight grain running the length of it. Pictured below we (my uncle and I) are slicing 1/4" planks on the bandsaw using the fence on the left as a guide and a featherboard on the right to keep a constant pressure at the sawblade which helps ensure a straight cut the length of the board. We got very lucky that it worked out so well.
Below here we are using the same process to cut 3/8" wide strips out of the planks that we had just sliced. Basically I would feed the wood to the blade and Richie would pull it through. It's also pretty important to keep the planks level with the table top surface of the saw. Not as important as later when using the shaper table though. If there is a bend in the center while being cut, the strip would be ruined.
Hey Uncle Rich!
Below is the shaper table and the jig that I set up to keep the strips from moving upward on the router bit that is going to first cut the bead. My uncle wasn't around for this so I just had to be extra careful at first and use some experimental pieces of wood so I don't ruin any good ones. The bead bit itself has what you call a "radius" of 1/4". Because the strips I am making are 1/4" on that side, that is the bit that I want.
Here is the view from the back of the shaper table jig. I had to custom make the upper fingerboard (blue one) so that it can still exert downward pressure on the wood strip as it passes over the router bit and allow for space for the sideways pressing fingerboards (in red).
Here is the beaded side of the strip. Pretty cool, huh? I first did 40 of them in different lengths between 8 and 12 feet.
And here is the rig set up and cutting the cove edge of the strip. I had to take the bead router bit off and put on a 1/4" radius cove bit for cutting the concave edge of the strip.


No comments:
Post a Comment