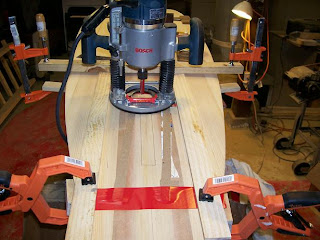
The router jig. Thanks to Cedar for lending me his router! I'm sure I could have done it (rout out my fin box) with my chisel but the router was much nicer and made really nice lines. I first made up a jig that guided the router with two pieces of strapping parrallel to the center line and fin box (at this point in the boards construction, the centerline is more like a grey area and it's like a roll of the dice, so use your eyes and have an overabundance of lighting!). Basically how I did this was to line the 1/2 inch wide bit up with the traced fin box lines and drew a point at the radius of the routers outside. Since the bit was only 1/2 inch and the cut needed to be 1 inch, I drew two points at both the front and back of the fin box so I can do a cut, then move the guides over and do the other cut. The cuts were done in five or six shallow passes. The red tape in the picture is holding two peices of cardboard in place because on either side of the fin box is a concave, so the cardboard filled in the concave so I could keep the router level. This router has a spot for a bubble level, so I put one in there (in red) to keep the walls even. It worked pretty well. It dug a bit into the hull planks nearer the tail, but only like a millimeter.

Ah, the camera sees more than the eye does. Before gluing, I eyed up the box with a fin in it several times with a level and a square. Another grey area is the level because at different poings in the board it varies slightly as nothing is perfectly flat as well as none of the concaves are perfect either. I did however have a good feeling that everything is mostly level. In the pic it looks like the fin is off a bit. But we must realize that the T-square is the only variable in that picture that is exact. The level is not exactly on and the T-Square may not be sitting totally perpendicular to the level either. It is just a general idea. But damn if it don't look off a bit. Put it to your eye though and it looks perpendicular to the gneral shape of the board. Personally, I think this was the hardest part of doing the board as it could make it or break it. I'm confident that it is on straight. If it is not, c'es la vie. Who cares really? I may never know the performance difference unless it hums like a hooker on Saturday night!
I put my Con's fin in the box, mixed up 3 toobs of epoxy bought at the hardware store with some fine sawdust and slopped it on the walls of the surfboard (which I deeply scoured with a dremel tool bit for the epoxy to fill into and add more support) and all over the fin box. I should have taped around the fin box before doing so, but I didn't. It's a little messy, but who cares.

Side view of the fin being held in place with tape. I'll let it dry two hours before even removing the fin.
There is a top edge to the finbox that will need to be sanded flush and I thought my board was finally shaped, but upon relaxing with my board and a few beers, I noticed that the rails just back from the nose were not egged enough which may not allow enough freedom of movement in the nose creating a suction sort of thing like I did with the first board I shaped when I was a lad. I also want to round the rails more just before the fin box freeing up some more of the boards movement.
I tried to egg the top of the rails towards the tail as to allow water to flow over the deck some for nose riding. This board is thin at the nose and tail and doesn't allow for much rounding of the rails.
So far the boards dimensions are 9'1" and 22 7/8" wide. I don't have calipers for thickness, but it looks around 3".
When the board is ready for glassing, I will tally up hours and money for the construction and shaping part of the board.
Later gang! Enjoy the surf if you are getting any today or tomorrow.