Saturday, May 7, 2011

Freedom. Far From Finished!

Okay, alright, time for me to grab a beer! I'm caught up on the posts! BRB... Man, it took me a room temperature bottle conditioned Grand Crux homebrew with an excellent head to realize that I had NO reggae on! WTF? On goes Linton Kewesi Johnson Dreadbeat and Blood. Great album!
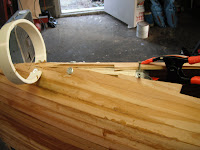
So like in this pic I'm cutting away 1/2" from the centerline with a utility knife. In a few passes the cedar just peels away. Caution is recommended in this process. NEVER HAVE ANY HUMAN FLESH ON THE DOWNWARD STROKE OF THE BLADE.
Then my Pop used that centerline guide stencil that you see at his left hand to mark where the centerline is from on the form to the top of the canoe. There is a notch in the stencil to allow for the cedar planks to set in. Basically we just connected the dots with the straightedge and my chalk line was almost exact! We brushed that off and used a ball point pen to mark the centerline.


Then we rough chiseled out most of the wood to about an 1/8th of the centerline. After that I found that raising the wood up off of the forms with a few wedges as I went along with the hand plane worked great! ****NOTE go get yourself a LIE NIELSON low angle hand plane!!**** You will never touch that Stanley again. The Stanley is a great plane, don't get me wrong, but the LIE NIELSON will get you through the tough glued spots much easier just like a wood surfboard will get you through that chop and into the next section of the wave better, the Lie Nielson will do you right. I planed the wood to 92 degrees perpendicular to allow for the later planks to set in easier to the molds. I tell ya, this process may remove some skin off your knuckles and may be tiresome, you just gotta do it!!! I was taking many breaks to sharpen my tools! It will give you a break from the monotony with more monotony! LOL Sharpening sucks! Where are my interns?!?!?!?
My Pop just had is left eye done for cataracts. He sees excellent now! Looks like a nice straight line!

Whatcha think there POP?
Freedom Picture Gallery Hull Stripping Take TWO!

Since the strips on this canoe run pretty much parallel to the waterline that would make the profile of the gunwales low and flat. This is pretty helpful to grab less wind on a windy lake or something. But the boat needs some sexiness to it so two strips are being glued to the gunwales at bow and stern to give her some more curves!


This pic gives a little better idea of the extra meat this lady will have to give her some curves. Basically we just faired a curved line from the tip of the stems to the third form back or so and cut on the line with a utility knife to get her curves. This wood is pretty soft and with three passes of the utility knife will shed her skin.


The last strips being glued in place. The last 14 strips we were able to glue on two at a time saving us some time. Each strip 1 thru 14 has an identical sister in color and length waiting to be shaped and placed in the other side.


Pretty cool pic of the centerline that I chalklined into place. This was really just for me to get a general idea of whether or not we planked the hull enough and really gives a good effect on the eye! Later my father will draw in the line using his neato centerline contraption, a straightedge and a clown to hold the straightedge (me).


One of our interns. Crazy kid actually likes working on boats. I will try and write, or have the interns write their own bios for the woodwatercrafts.com website!

Freedom Picture Gallery Hull Stripping

Here are some pretty pictures that were taken just before the hull stripping started. A nice side view gives you the the general low profile shape of the canoe at the gunwales. It would be a good canoe in the wind because of this.


Pretty cool bottom view. You can get an idea of the matching strip colors on each side a little from this picture. The glue impairs it, but it will come out real nice after sanding and the epoxy coats!


Although this boat has a low profile and looks a little "rigid" in the above two views, this angle reflects it's semi traditional lines that it still has. This view also lets the viewer in on the asymmetry at the bow and stern stems a little. The bow is cutting the water and the stern is allowing it to flow away from the boat with ease.


Nice! You can see the Early 1900's Peterborough hanging up in the background. This boat was actually used by the previous owner to train for the famous 1936 Olympic Games where Jesse Owens destroyed Hitler's track and field team! Go Jesse! Anyway, the boat was left outside by one who wishes to remain nameless and is in a state of disrepair....


Let the hull stripping Begin!!!!!!!!

Canoe Clamping Contraptions Continued :-)

Ha Ha! I just love to f@#k with alliteration. It's easy and cheap while making me sound smart!
Here we are still clamping to the stems and am using spring clamps to hold the strip to the form and a screw in the form with a wedge pressing the strip to the previous strip. The screw system was a great idea that we used up until the very last strips before we started the next process of stripping only half of the hull at a time, which we are currently engaged in.

Further along the space gets more confined and had to eventually switch to the PVC clamps that I made from 4" PVC and two small wood screws with a few washers. Some of these holes from the screws will actually not be seen as they will be covered up by the top oak stem. The holes that you will see will actually be very small and hopefully will fill in OK, not sure yet on that one.

(Tips on making PVC Clamps: get an eight foot length of 4" PVC and cut a multitude of two different width rings, 1/2" and 1". The 1 inchers will provide a stronger clamping strength than the halfers and the halfers will fit into tighter spaces and provide good clamping strength. Now slice each ring on band saw to make a closed "C" then on the drill press clamp that closed "C" onto a spinning 1/4" or bigger bit. This notch that you put on the clamping surface will be extremely handy in holding that clamp onto your piece, whatever it may be. No one tells you this, I had to learn it on my own. Last but definitely NOT least, if you have a deburring tool for plastics, use it around the entire edge of the ring either before you notch it or after, but this will take a long long arduous time to do, but OMG it will save your hands from all kinds of cuts and sores using these clamps. I found it to be a great relief deburring them!)
Here is a combination of PVC clamps being used, one to push the strip down on the previous strip and the other to press the strip to the stem. Those screws that we used on the previous strips were left in place and provided a perfect place to clamp from!
Bow Stem Section.


Same thing here, different view. Bow stem section.


ON this canoe the bow and stern stems are not symmetrical so the clamping arrangements are different. This is the
STERN stem section and you can see difference in clamping. The taper at this spot is more gradual.

Canoe Clamping Contraptions

Ah let the ingenuity begin! Actually, this inventiveness started well over a month ago. I am backtracking to get us up to speed on the present status of Freedom. Here is a close up of the early system of stem clamping that we used. This picture was taken when the strips were just at the bottom of the main curve of the stem. The necessity for wedges from all directions becomes apparent with the two major curves the body of the canoe takes here. We really are "torturing" the strips into place!

Here is another picture depicting the same clamping procedure. The big C clamp is the foundation for yet another wedge pressing the strip tight onto the strip under it. It gets tricky and this is where the beginner like me is going to spend much of his time just coming up with ideas on how to press down on the glued strip.


Here are our L brackets being employed at the top of the curve. The L is clamped at the form and a wedge is pushed under it to press the strip onto the strip underneath it and a wider taped wedge is pushed alongside it to press the strip to the form. Pushing down on the strip too much could actually push the previous strips away from the form so we had to back off on making them "gorilla tight" and actually had to put a few nails or small screws in the previous strips to hold them to the forms as to not misshape the canoe.

Even higher along the stripping yet another clamp came in handy. It is a modified version of the one we read about in Canoecraft, by Ted Lundy (Bear Mountain's instructional manual). This actually clamped down in three places and came in quite handy! I think it was only useful for 3 strips and then we had to move on to the next series of clamps to be in my next post. Most importantly we learned that this clamp actually pressed down on the center of the stem really well. Look at the recurve in that top piece! Nice!

This pic gives you a better idea of the clamping pressures. The center one pressing the strip onto the previous strip and the two side ones pressing the strip onto the stem (two people are needed to press the jig onto the stips as the other tightens the C clamps to hold them in place. It was cumbersome, but served its purpose really well.