Thursday, March 3, 2011

The next Boat Show 9/10/2010

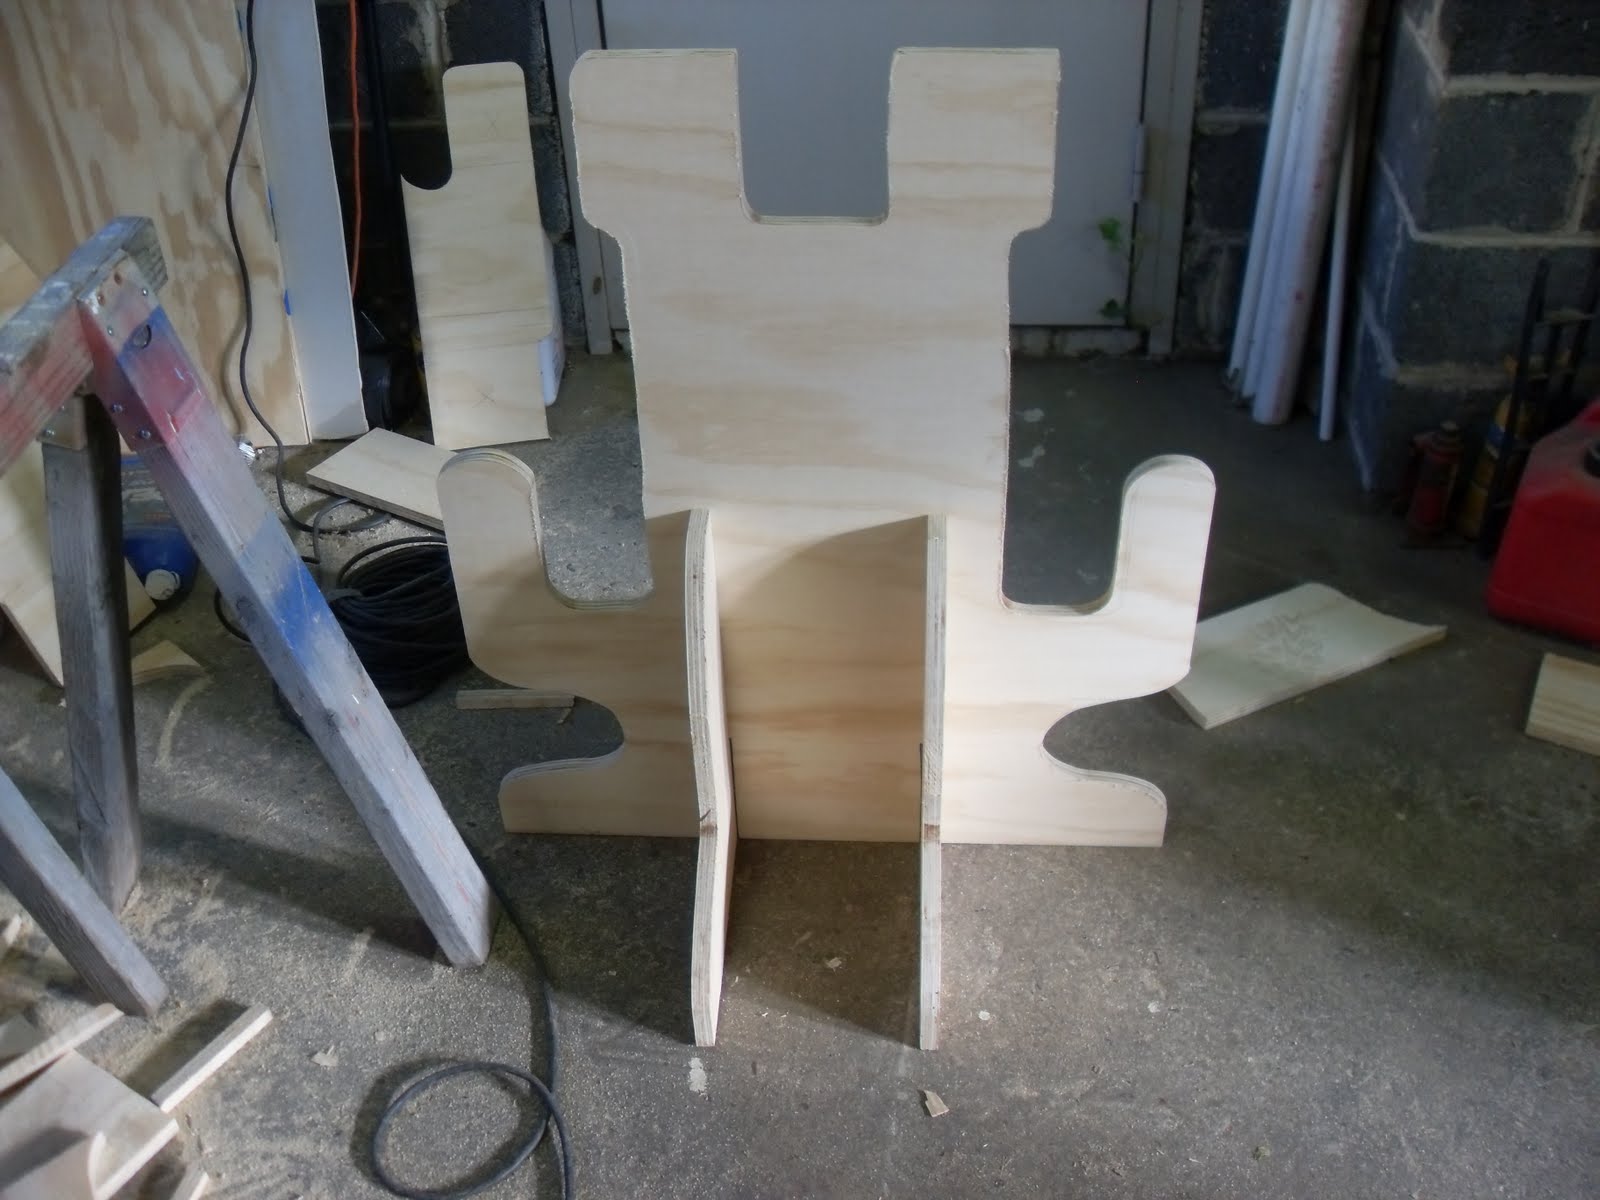
The next boat show was the next weekend. It was in Toms River, NJ on Sept. 10, 2010. It was a classic boat and classic car show and man did I ever try and pair up my boards with some of those Woodies! No bites though! In order to showcase the boards better and keep them from getting dinged up I stole a design from George Kerr at Sedge Island Skiffs (Gorgeous boats by the way check him out at sedgeislandskiffs@live.com) and built these racks from 3/4 plywood and some green flag material overtop pipe insulation.

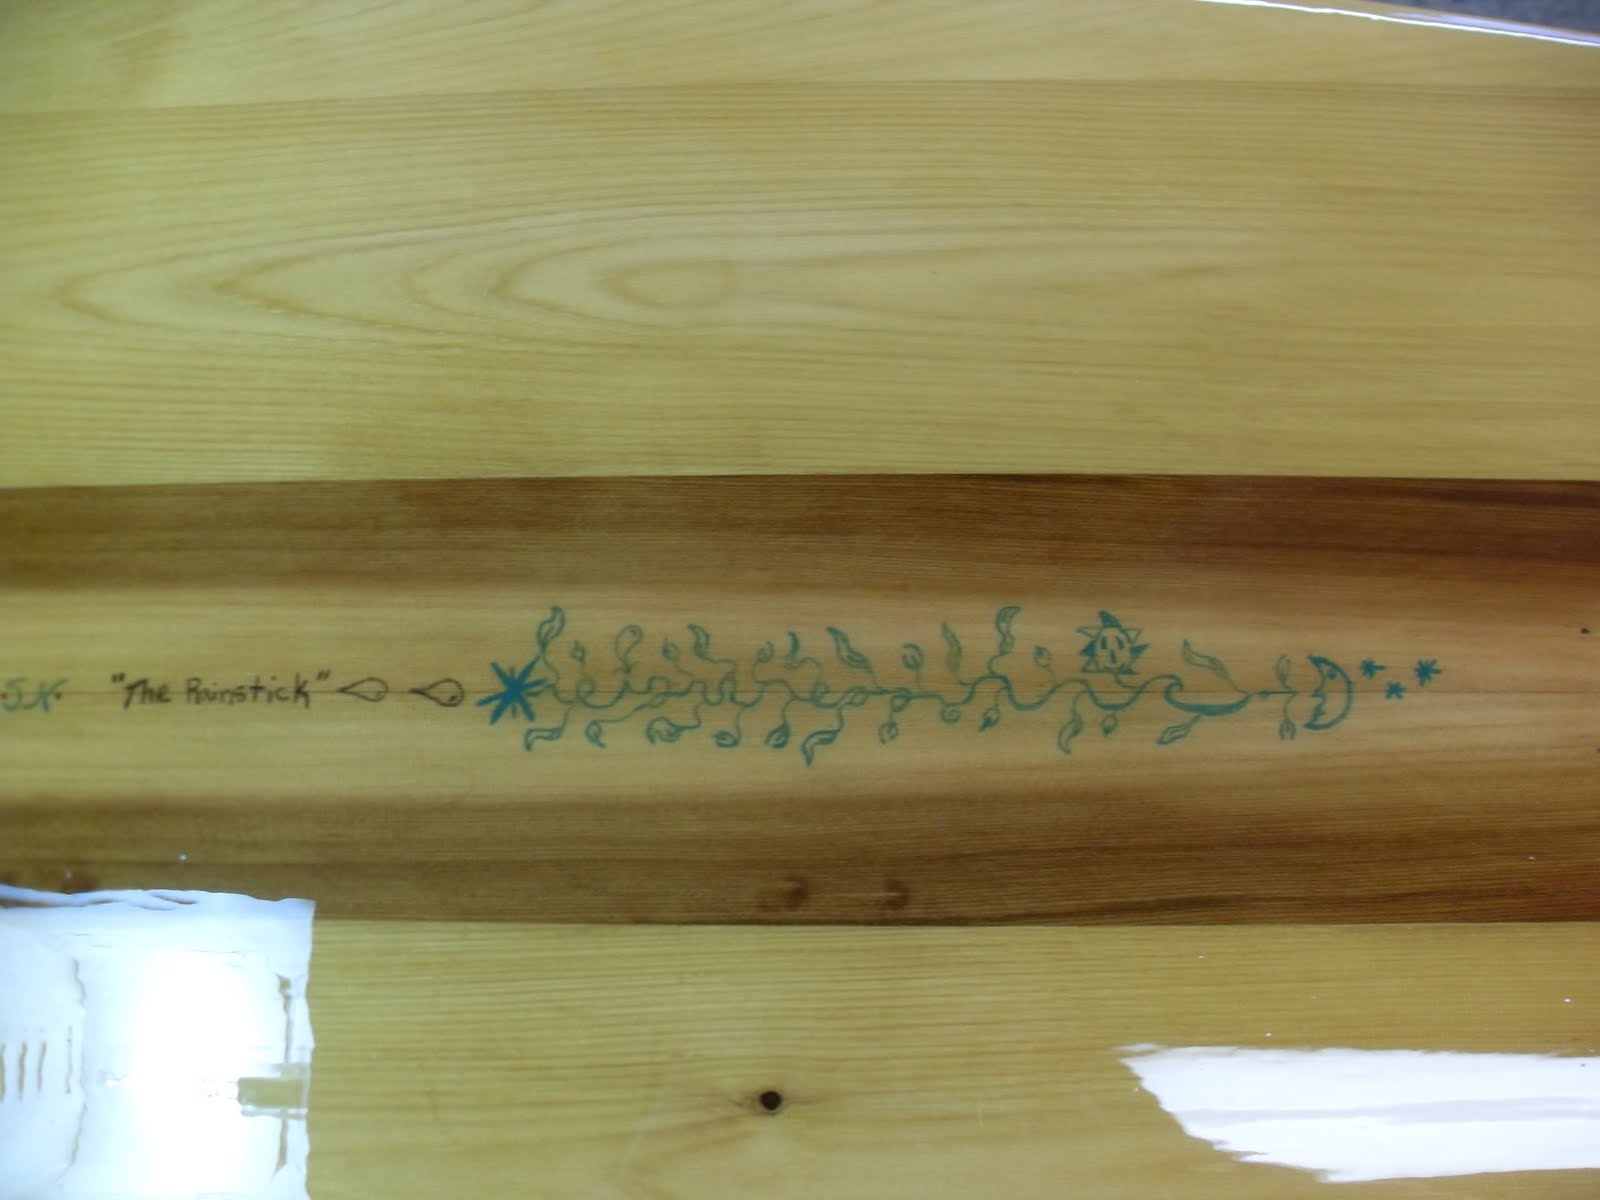
The Rainstick was done in 2007 but I was never happy with the finish. Finally, I found Epiphanes Varnish and fell in love with it. The Rainstick got two coats before the show. But it takes a good 36 hours to cure and was a little gooey in the sun at the show. LOL you live and learn.
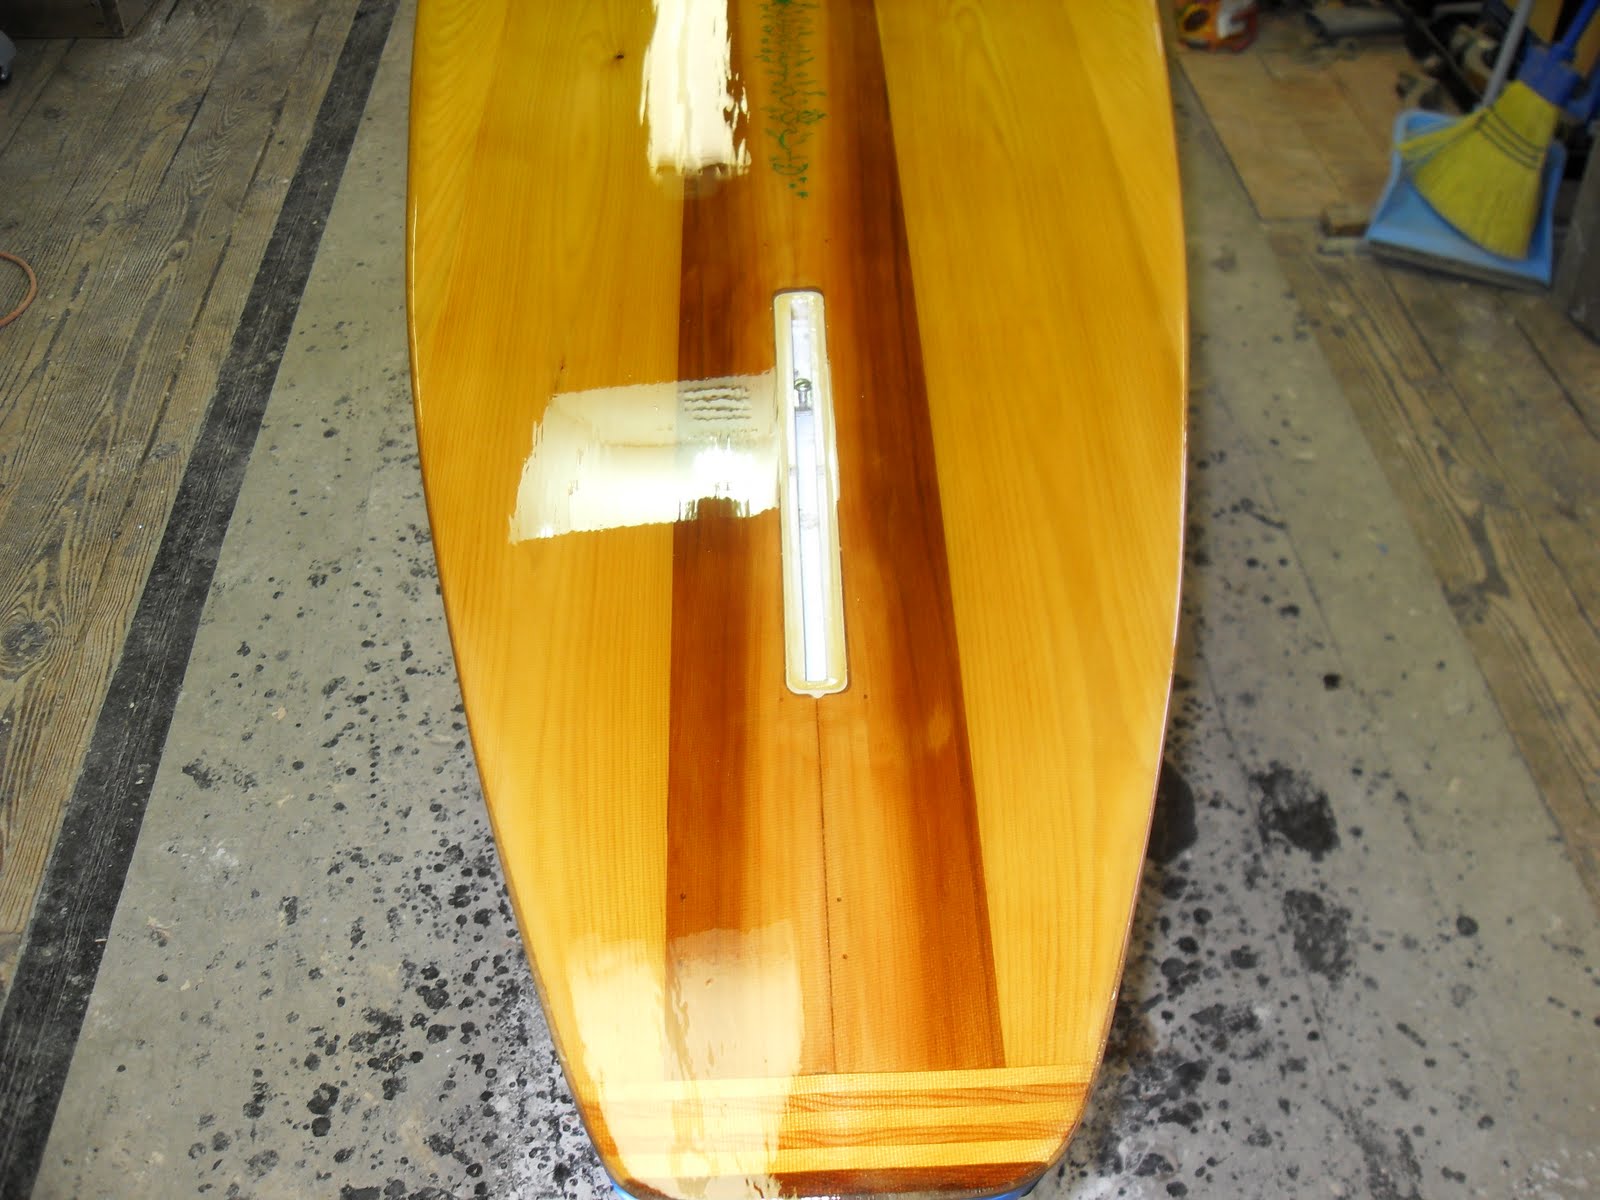


Love it's color!!!!


There is my Pop manning the fort while I go and browse.


A nice shot of the rainstick and the wormhole. I really like the yellow from the varnish on the rainstick. I'm curious what it would look like on the wormhole!!!

OK, that is it for these boards! I hope that you all liked reading about them. Not only does this blog keep things straight in my head, but I hope that it helps, or inspires or just entertains some of you along the way! Next up is details on my Dad's canoe and maybe along with that, my next board which will be a ten foot "Log" called Waterlog from Grain Surfboards. Good guys at Grain. Check them out if you can. They are also in the Chesapeake Light Craft catalog as well. Later Skaters!

3 Days till the Show! 8/31-9/3/2010

The Tuckerton, NJ Classic Wooden Boat Show is 3 days away. I had been working 16 hours a day over a period of like 4 weeks I beleive. Not sure. 220 hours plus invested into this puppy. I would be the first to exhibit a wooden surfboard at the show. They had just opened up a surfboard exhibit themselves at the museum so I was stoked to get the chance to get my boards to them and show them off!
Look closely, you will see major impact craters created by little particles of dust in my last hot coat for the board. If I didn't have those, I would have to do NO sanding. Look how shiny that coat is! Unfortuneately, I had to fill those pits in with epoxy and do more sanding to get them out. Mega-suckage!! I think that added another 12 hours on to the ordeal!!!!! It really pays to get a dust free room set aside for glassing so this doesn't happen!!!

*Those Raviolis are awesome by the way!* Blue is staring at me again begging for blood worms. He watches Stargate SG1 with me all the time.

The finishing touches, 3AM in the morning before the boat show. Im using wet/dry sandpaper. Starting with 300 grit moving to 1200 grit. Wet the board with water and sand away with your sanding pad! Laborious, but well worth the outcome!

My Mom and Dad have been extremely supportive of me since I moved back from Oregon. They mean so much to me and I hope they know how much I love them! The taller gent is my buddy Mike Visman. He and I grew up together and built surfboards back in the mid 1980's. His help with this board, as well as my Dad's, is so appreciated! Family and friends mean so much in life! Cheers Guys!!!


Me.
Sept. 3, 2010
Tuckerton, NJ
Tuckerton Classic Boat Show

There was a need for a better rack system, boards kept sliding.

My best friend Wade Donaway from LBI brought his family to the show so he could hang out and whatnot. I don't think I have a pic. Wade is one of my best buddies as well. His grandma and grandpa were the best people ever!

Fin Box August 30, 2010

*Tom Petty, First Flash of Freedom* on the radio. Second beer in hand. My Krazy krauzen Grand Crux. Well it's Georges recipe from Homesweet HOmebrew. Good stuff. I need to get some of this beer to my dad's co-workers. I will make them a package of brewskis.

OK, I won't give you the dimensions of the box that gets routered out for the fin box to be epoxied into it, but will go over the process. First the box is drawn out from the centerline of the board and then guide rails are placed around the box. The base of the router will guided by the rails keeping the bit from Dad's old trusty router inside of the box that you have drawn.

From there it is just a matter of getting the hole for the box done. I tilted the router when entering the cut so it eases into the wood on an angle until you have a good hole. The depth of the bit I kept at an eighth of an inch or so just so I don't burn the wood or epoxy. Here is what it looks like finished...


What was done next is that the fin is put in the box prior to expoxing it into the hole. This is so you can tell by whatever means that you have that the fin is at a 90 degree angle to the boards hull. Tape off the area around the hole so that you don't make a mess. Layer fiberglass in the hole and wet it with epoxy. With the hole and the glass all wet, set in the fin. Use masking tape and strap the fin from the top to the rails of the board to keep it straight like you want it. Pull down on it if you have to press down on the glass a bit. Hopefully you won't need to. don't stress this step, it's actually not that tough. Just make sure it is straight up and down or that baby will hum in the water and attract those big breaching great white sharks!!! Get your cool uncle to help you get a second opinion on its perpendicularity.

When it is dry, pull off your tape and sand it all flush. I used the orbital for most. I also didn't do my last hot coat. If you noticed the whole hull was sanded and ready for another hot coat. I taped off the finbox and left the edges exposed so I could cover them with epoxy in hence strengthening it and making it look better.

Annies Ravioli time. I need something to go with this beer!

Hot Coats!!! 8/28/2010

*Pearl Jam* Jammin on XPN!!!!

Shite, you can see some of the problems of epoxy when it comes in contact with dust or wax or whatever. Too much heat. So many variables can make it do what you see there. Some call it "orange peeling" of the epoxy, I call it lemon peeling because it leaves a bitter taste in the mouth. To tell the truth I don't know what caused this. I do know that it makes things much harder when you have to sand heavily between layers!!!

The deck looks pretty good here. I didn't get any peeling on this layer. I tape off half way up the rail all the way around the board, that way if drips start, they start on the tape and the area above the tape is mostly smooth. Pull the tape off about an hour into the drying so that you can get the tape off otherwise you will find yourself with a razor knife sweating and praying that you don't leave gouges in the glass leaving marks. That sucks so you gotta make time to be around to pull that tape off or your day will get much worse.

I took several pics of the only design that I put on the board with colored pencils. The best pic was in the shadow of my arm. The design faded in the sun. The epoxy was supposed to have UV protection in it. I don't believe that it does. I may have to go in and make a design with some permanent markers or paint and cover them with super clear box tape and give it another hot coat. maybe........

Deck hotcoat of "The Wormhole" 8/27/2010


The first hot coat of epoxy over top of the fiberglass layer. This is done with a 3 or 4 inch paint brush. Disposable of course.

*North Mississippi All Stars* playing. Good tune! Still working on that first Sam Adams on an empty stomach so it's all good!

You can see how the epoxy really makes the grains in the wood stand out and it becomes so colorful! Excellent! But along the nose, we see some more "ghosting". Sigh...

A Save worthy of Cliff Lee 2/26-2/27/2010

*Express Yourself* on XPN. Groovin tune...

So like I said in the last post, I totally fecked up the deck and had to sand that shite off. I went to my friend Brian Gagliana at Greenlight Surf Supply and grabbed more epoxy and more glass and did it over. This is what it looked like after glassing two layers of S-glass on the deck. If you look hard you can see the haze down the center, but that is going to be one "tuff as nails" board if I ever knew one! I actually have the bug to get out there and do another one. I have a ten foot log kit lined up from Grain that I am going to make out of Pacific Northwest Redwood. MMMM HMMMMMM!

After the deck dried, I flipped her over exposing her belly and sanding the laps down from the deck layers of glass. The orbital is totally cool doing this. Melted away the excess glass like butter and the next step was to hot coat the glass with more epoxy. I'm not sure if I sanded much in between these coats. I'd have to check my notes, but you risk sanding through the fibers in essence weakening the board.

THEE Mistake 8/25/2010

With the laps of fiberglass from the hull on the deck sanded down flush I went ahead and layed down two layers of S-glass down over the deck and went through the process of glassing the deck. Prepping the job and the job probably took 5 hours or so. I had no idea of the horror I would see the next day as I had anticipated that I would just be doing my hot coats of epoxy at this time.


Here is a result of the epoxy at the laps from the hull on the rails of the deck. Wetting out the epoxy on the hull the day before, the epoxy starts to set a little by time I get to the rails, at this point, the epoxy still wets the glass and it still adheres, but it is more viscous and my guess does not penetrate the wood as deep as fresh epoxy does leaving this "Ghost City Skyline" look on the rails. My heart sunk into my stomach. It looked terrible. It looked so bad that I had to take a belt sander to the board which was a grueling task indeed. And then, in another mistake, I didn't take out the middle section because it was taking too long to sand off. To my dismay, that center line about 8 inches wide running down the center of the deck clouded up later under my next coat of epoxy and fiber glass. I shake my head while I write this right now. It still kills me. I so fukked up this board. But it is passable as a surfboard, probably only because of the shape of the frame that Grain provided. To this day, it still kills me. No one at the boat shows noticed it, but I did.

Fiberglassing "The Wormhole" Hull 8/24/2010

I'm not sure what I had on the radio at the time, but I was listening to a lot of the classical channel and at night jazz, but right now I have Y Rock on WXPN on and a cold Sam Adams Irish Red (one of my favorite beers) in my hand.

These are stands that I made in 1983 when I first started to fiddle with dings in boards and such. It was difficult in high school to be involved in surfing because everyone else liked gambling and drinking. The stands withstood the test of time because I begged that my parents not throw them away even though I moved to Oregon. I am so glad that they are here because they are really really handy in all stages of the surfboard construction. there are lots of different ways to have stands, and some designs are more stable and I may look into those for my next board, but I will never get rid of these.
OK, take notes: This is S-glass, it is really nice, but the weave is really tight, which makes it invisible, but it is difficult to saturate with epoxy so only do it in single layers. Also, when working with wood I am always going to paint on a layer of epoxy beforehand on both the deck and the hull because in this undertaking, when I epoxied the laps, I didn't tape them off, it's not necessary, but the discoloration that you will see in my next post will make your skin crawl! It did mine and cost me probably 100 bucks and another 48 hours of work. It was bad. So, one layer at a time on top of already epoxied wood. I don't think the weight will be effected too much. Not sure.
After watching about 40 hours of Austrailians glass boards on Youtube I once again entered the lions den! Here I am using a white rubber squeegee. WRONG! They are made for polyester resin. Use the plastic ones. But this step went really well. I did record the outside temperature in my notebook that I make all my notes in, I think it was about 74 in the shop with the air conditioners on. It went really well. The glass was snipped perfectly at the edges, folded over nicely. Not sure if I want to use S-glass again tho. Too many micro air bubbles it seems.

*Dave Matthews "Crash" playing on the radio. Mellow tune, but kind of the bedwetting genre to me. My Discus fish "Blue" is staring at me.

OK in this pic you can see dry spots in the glass where the wood beneath sucked up more of the resin that in other spots! This is another reason that I wan't to put a layer of epoxy down first. You can see the fibers in the glass at these spots, but all in all, the epoxy really makes this wood "POP" doesn't it? Look at that black walnut! Frikken beautiful! I'm not sure about the adhesion of the epoxy to the walnut, I guess the only way to find out is to use the board!!! For many reasons, I'm going to make this my personal board and not sell it. Too much time was invested into it to assign any kind of price to it. I'd have to sell it for 7000 dollars to pay myself 20 bucks an hour and make a little profit plus it ultimately did not turn out how I wanted it to due to my inexperience and experimentation with backyard epoxies.

Sanding the Surfboard "Wormhole" August 24, 2010

Utencils employed in hand sanding look like these! The one that I used the most was the red one. I got it from Woodcraft or Ebay for 20 bucks. It was well worth the money. I did cheat and use power sanders to take down most of the wood because hand sanding proved to be wicked long and really difficult to take off a lot of meat. When I finally got to a point to switch to hand sanding the wood, the red one was the only one that worked well. The smaller foam one was excellent for sanding and polishing the epoxy layers later on and the larger foam one was a waste of money. That one would only be good to use on foam surfboards, it's too flimsy.

This picture shows 3 mistakes that were made along the way. In the second plank from the left, you can see the split in the wood from when I originally glued the deck on to the frames. Just to the right of that you can see a line where I sanded through on the nose around that curve and on the tip of the center planke is a huge spot that I sanded through. I simply filled them with epoxy and sanded more and they were hardly noticeable in the end.


In some of the previous posts you saw the tailblock mounted on all large and clumsy, but after a lot of power and hand sanding this was the final result for the tail. I'm pretty happy with the result and next go around I am going to spend some time making nice designs in the wood. I kind of liked how I faded the colors light to dark in this one. I was really happy with how crisp I had gotten that line where it meets the planks.

Left You Hanging


I left you guys hanging with "The Wormhole" project pics and descriptions. Totally my "bad". It was a very busy time trying to finish up that board and get it, and it's older sister ready for the boat show that weekend. I am, over the next few days going to try and catch up on those pictures so that I can get to the pictures of the Canoe that my Dad is building downstairs. We have gotten over most of the hurdles of setting it up for stripping and I think the rest of the project will fly by pretty quick. Stripping is the most interesting part. The work leading up to stripping is really the most important part and is pretty much a pain in the azz. But the whole thing has to be level and straight because we are working off of a center line and it's all got to be 90 degrees or parallel working from it. So yeah, lots of eyeballing and making sure it's all in line or the canoe might just go in circles! A'ight, let me get to the surfboard. Have a nice night blogosphereites.

Wednesday, March 2, 2011

Spring is in the air...in Charleston.

Ah, the progression from the pre-Christmas snowstorms and all those that followed to the very beginnings of Spring is a most welcomed feeling! It was a tough winter on Philly which was NOT helped any by the city's ineptitude at gauging the foul weather correctly to remove the snow from the streets. They did a good job at clearing I-95, but for the local streets, they dropped the ball.

This is a pic of Benner Street. My place of residence. (I still have the lights up, they will come down now that it is warming up). I was dating a pretty girl Lyudmila and took this pic on one of our dates. I ne'er thought to get her in the pic. She would have said "I'm too fat" in her deep heavily accented voice anyway.

The Wood Burning Stove in the shop on a later snowstorm. I thought it was a cool shot. I got lots of decent pictures from the numerous storms, but blogspot only allows 5 per post so I took a progression of only 3 of the storms. The stove was a gift from Geoff McKonly when I worked for the Philadelphia Wooden boat Factory. Thanks Geoff, the stove is a nice addition to the shop! Geoff is teaching a boat building school in New York City, it's a pretty good school. Don't remember the name off hand.

Here is Andy shoveling a path in yet another one of our storms. This one in early 2011. This one buried us even more than the others and since the others hadn't melted it was an even greater challenge to shovel. The temps hadn't risen above freezing for two months, so it stuck around and it was a mega menace to drive on the secondary roads. Once again, the city miscalculated salting and plowing. Salting 24 hours before a storm, not plowing and then salting in 15 degrees at night instead of at near freezing temps during the day when the sun is out. DUH

And the switch to Spring! This is part of the view from our hotel room on Shem Creek, SC. I have the panoramic, but couldn't load all the pics. I"m gonna load them all on my facebook account (Wissinoming Brewing). It was cool watching the progression into Spring as my Dad and I drove south on I-95. PHilly still had a bit of snow and NO buds on the trees (still no buds on them), but as we got into Delaware, they had a ton of snow from a storm a day earlier and no buds on the trees. Maryland same story, lots of snow, still on the branches with no buds. Virginia, little or no snow and no buds. Virginia looked as bleak as PA did. Southern Virginia had small patches of red color on the trees, very little, but noticeable. And when we hit North Carolina there was clouds of red hanging in the trees. It was really cool for Dad and I to see some color in the trees for once! When we grudgingly left Charleston, those red buds had actually started to bloom and the pear trees were in full bloom! It was incredible to see this happen all in a days time!!! Awesome! The end of February, Shem Creek has an annual Mardi Gras Fete. In sight of our hotel room window were 5 outdoor bar / night clubs and it was poppin! Over 2000 people had signed up for the fun and it was raging for most of Saturday. We kind of avoided it, and that was a pretty wise option anyway. I"m not big on crowds, although there were girls-a-plenty! I had gone out the Friday night before across the creek to Reds and they had an incredible band from Tennessee playing there. A bit of boozing, a bit of dancing with fair maidens of the blond variety and I was in heaven. I was, however, distraught when the band finished up at midnight and everyone disappeared in a flash and I had just gotten a good buzz rolling! So I meandered around that area of Mt. Pleasant looking for more goings-on and found a little pub that had some microbrews for me to taste. Once again, when I got there, there were lots of girls, but after my first beer, they were goneskis. I had Stone Arrogant Bastard to start off. OMG, wicked bitter. Over the top for me, but I knew that goin in so that is that. Nice alcohol by volume content though! Then I tried one of these newly found belgian sours that the craft beer industry is trying to shove down our gullets. It was from Allagash and it was mind curdling horrible. I'm a beer guy, and to tell you the truth, I would not classify this as beer. It tasted like mead that has gone bad! I might be able to tolerate it as a marinade or if it was paired up with some heavy on the lemon meal or desert, but man, I took two sips and asked for another micro brew. I can't recall which one now. By that point I was pretty lit and man did I feel it Saturday morning! After a gallon of water, my dad and I were ready to hit the road in search of some trouble to get into while we waited for my nephew (the reason we were in SC in the first place. He's at the naval weapons station getting training as a petty officer in charge of nuclear power plants on carriers. we are pretty proud of that lad. a brother to me and a son to his grandpop. a good guy all around). While we erroneously driving to find Fort Sumter (which is actually in the middle of Charleston Harbour) and laughing at the futile drive to the south shore of Charleston Harbour, Chris called and we changed direction and headed to a truly spectacular sushi lunch in which Chris drank a full bottle of plum wine! NICE! I passed not wanting to waste a truly delicious repast. We found ourselves at the south battery of Charleston ogling the college girls in bikinis and sweating alcohol. A truly summertime thing to do! OH! and my Dad claims to have seen a "very large shark fin" in the water! If it was Philly I'd say it was probably a half submerged pizza box or some other form of refuse, but this was Charleston Harbour. Immaculate to the core! Maybe he did see a fin! I would bet it was a dolphin eating baitfish because they are starting to run down thar I do believe.

Friday morning before Chris's ceremony we dropped by the Yorktown to see the Fighting Lady. This is a really good pic. We timed it so that during a 2 hour rain storm we were on board and below decks to stay dry. Pop had a lot of fun. I'm glad he didn't let the rain get to him too much!

And so goes my introduction into Spring 2011! We Yankees are all just waiting for those trees to bloom up h'yar!