skip to main |
skip to sidebar
Patching a hole in the hull of a Catalina 22 Sailboat named TARDIS
Elaine! I'm posting a project for you! Ha Ha Ha!
I actually haven't posted many of the projects that I have been doing or documenting them either as time is usually short. But today I decided to start blabbing about my sailboat that my Dad, Uncle Richie and myself procured last fall. She was basically stripped of all of her wood by my father and uncle and revarnished, cleaned, upgrades made to some hardware, and the keel removed and the pivot bored out and re-sheathed with stainless steel. The keel is called a swing keel and it is lowered and raised at one end and pivots on the other. Well the keels fulcrum where it pivots from was really corroded and worn out and the keel was all wibbly wobbly sort of like time travel in the space time continuum. That was a task! I will document that later perhaps. But tonight I want to talk about patching a hole in the hull forward of the keel box in which the keel retracts and pivots in.
Just forward of the box there is a noticeable hole and crack.
Before it was sanded down it was very obvious that the whole problem was caused by a bubble between the layers of fiberglass matting during manufacture and basically is a FAIL on Catalina's part! Here you can the edges of the bubble with the dental tool in between the layers of glass.
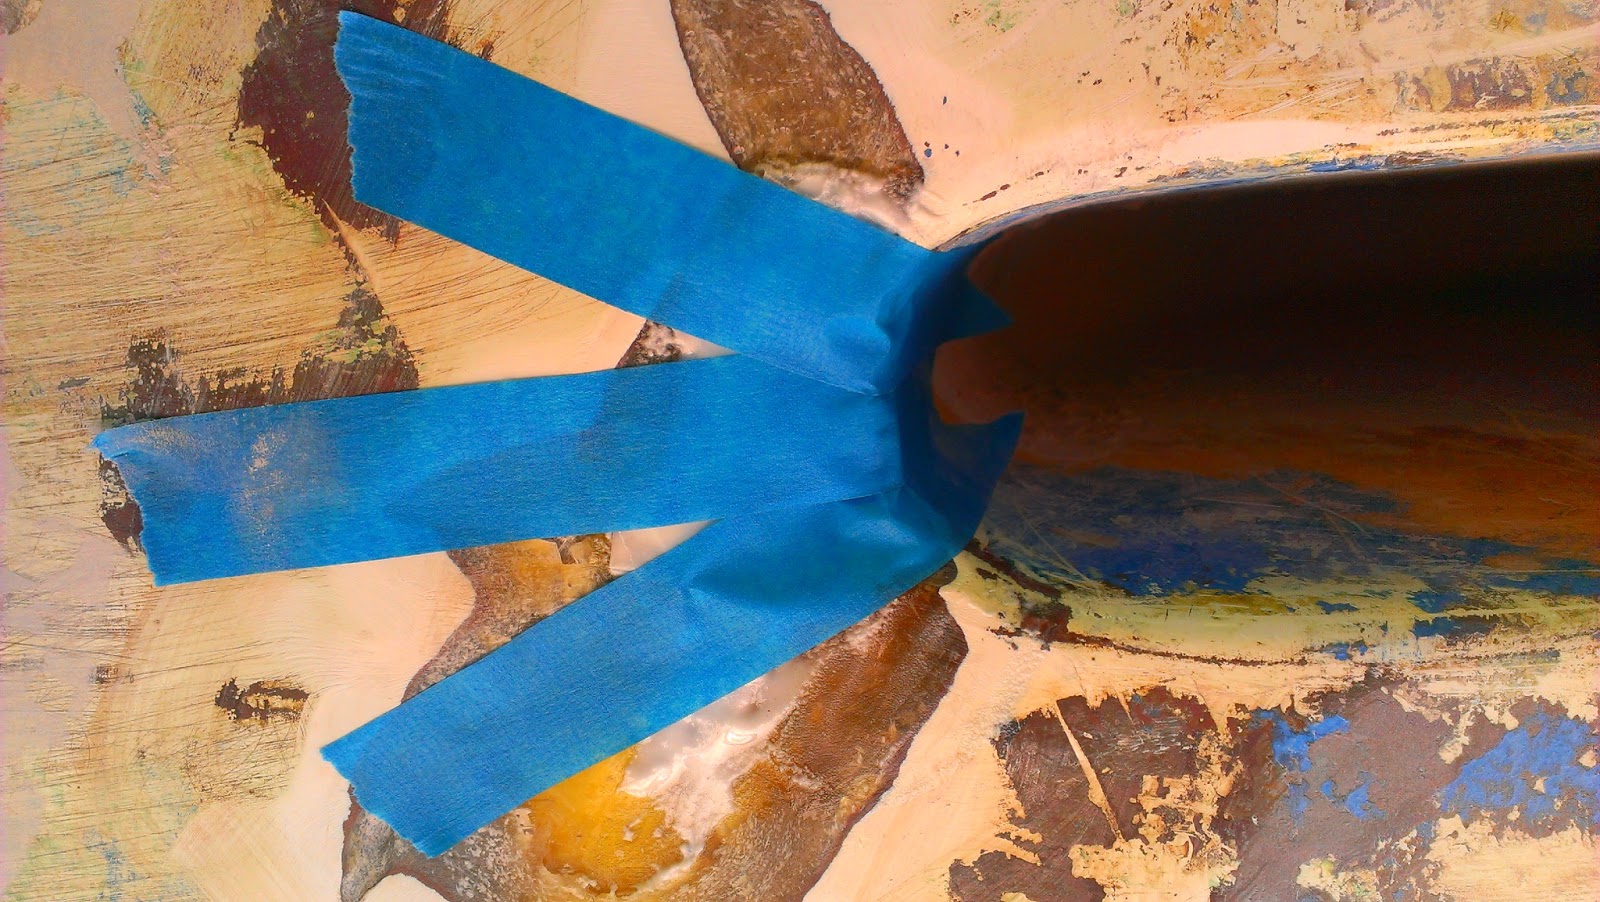
My Dad prepped the surface with the almighty angle grinder and got it ready for filling with epoxy and fiberglass. I chose to fill the major portions of the hole and deep gouges accompanying the cracks with Q-cell which is glass like fiberglass, but just bubbles instead of glass threads. It's basically a filler and there were some pretty deep divits to fill. This is what it looks like after the tape was removed as it was really difficult to try and get a shot of it while forcing it in with the tongue depressor. The before and after pic would look the same anyway.

The Q-Cell is mixed with a batch of pre-mixed epoxy to the consistency of peanut butter (a thicker ratio may be too dry and not bond well with the surface of the prepped fiberglass. It is also tricky because the boat was made with polyester resin and epoxy will adhere to dried and cured polyester resin but polyester resin will not adhere to cured epoxy. It's weird chemistry but they are two different entities. Polyester resin does not add any structural integrity and relies purely on the fiberglass for strength and it also dissolves some of the glass as well making it adhere really well but weakening the glass some. Whereas epoxy molecules lock together in chains forming a structure and protective coat as well as incorporating the fibers of the glass into the mix making it doubly strong as the polyester resin. It's just a little of a gamble when working with the two. But anyway, the hole was filled with the wet epoxy and Q-Cell and because it was only peanut butter consistency it had to be dammed in place with painters tape.

This process kept the shape of the hull and the edge of the keel box really well but as I was taping, filler seeped out around the edges of the tape so I had to make sure that I did not let this harden for two reasons; 1. If it hardened then bits of the tape would be embedded in the filler making it weaker structurally and 2. part of the epoxying process dictates that successive coats of epoxy and fiberglass, etc... have to be within the time that the epoxy cures or there will be no chemical bond between layers and they will peel. Being that I had planned to do at least two more coats (I actually did 6 more coats) the tape had to be removed and the filler checked for curing. At about an hour I peeled off the tape gently and the filler still wanted to flow out a little bit so I put down a little bit of wax paper and retaped it.

Feeling that the filler needs to be in contact with air (I'm not sure if this is true, but it seems logical and my experience with these materials has led me to believe that it will cure faster exposed to the environment) I removed this tape and wax paper about 30 minutes later. When doing this, I keep an eye on the container that the epoxy was mixed in to get an idea of how the cure is going. On this section I learned that wax paper sticks to epoxy much more than the painters tape does and pulled a bit when removing it leaving a rough surface which was advantageous
for me. Notice the right side of the patch.
The next step is to fill the depression with as much fiberglass as you can. I had tons of 6 ounce fiberglass cloth around and put about 4 coats of 4 layers thick of the fabric after the filler step.
Basically you paint on your epoxy, press down a glass patch and then wet out the glass with more epoxy on your brush. Here you can see what the glass looks like pressed on to the surface by my vinyl gloved hands. Where my fingers pressed on the fabric, the glass turns clear as the it wetted by the epoxy. Then you brush on more epoxy and wet out the rest of the fabric. I did this with four layers of the fabric and then let it almost cure all the way (chemical bonding) added an other 4 layers of glasss, let it almost cure (chemical bonding), added another layer of four pieces of fabric, etc... for four layers of four layers of fiberglass fabric.
It is done in thin increments like that because if I were to layer out 16 layers of fabric at one time it would pose two problems: 1. Thick layers of curing epoxy give off excessive heat as it cures, it can brown, get extremely brittle after curing, and can delaminate and 2. all of those little spaces in between the stitching in fabric have air holes in them and the patch will not be as strong if all those patches don't get filled with epoxy from the consecutive layer of epoxy and fabric.
That being said, when it was all finished, I had to come back an hour later before the patch was completely cured for the sake of chemical adhesion and brush on a final filler coat of epoxy to fill the air voids in the top layer of fabric.
Tomorrow it will be sanded flush removing the hill tops of the fabric and then coated with a bigger patch of 3 or 4 layers of glass. Sanded again and then ready to be finished with the bottom paint for the boat. WIN!


No comments:
Post a Comment